Creative Design
All our staff understand great design and how best to turn it into professional print.
James our in-house graphic designer has 30 years experience in the print industry, having graduated from Camberwell College of Art and worked for design companies such as Paul Smith and Betty Jackson.
We know good design is essential. Our design service will bring creativity and balance to your visual projects. Whatever your vision we can bring it to life with creative design, from a business card, a simple leaflet or logos and branding we design it all.
Contact us now to see how we can help.
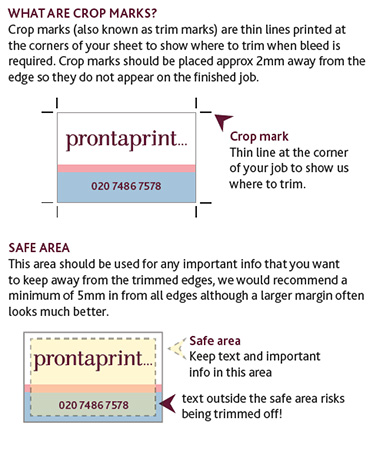
How to create a file with Crop Marks
Creating a file with crop marks should not be difficult! Here are a few tips on how to make crop marks in your documents.
InDesign:
Open a new document and find the “Bleed and Slug” section at the bottom of the new document window. Adjust this size to 3mm. Press OK. That will serve as your bleed/crop mark reminder. Then, when finished designing, begin saving your design as a print-ready file (File > Adobe PDF Presets > [Press Quality]). Name your file and select the save location. Then, select “pages” rather than “spreads.” Once there, click “Marks and Bleeds” on the left of the panel and check the box for “crop marks” and the box for “use document bleed settings.” Finally, click “save Preset” and export the document!
Illustrator:
Start by creating a new file by immediately clicking “File>Save As.” Name said file and choose save location. Then select “Adobe PDF Preset” > ”Press Quality.” Next, find and click on “Marks and Bleeds” on the left panel and check the box for “Trim Marks.” After that, uncheck box for “Use Document Bleed Settings” and make these all 3mm (or 5mm). Finally, click “Save PDF” and you are done.
Photoshop:
Open Tools > Print Production > Set Page Boxes. Choose TrimBox under Apply to and enter .25 in Top, Bottom, Left, and Right fields. Click OK. Then you should see a guideline box showing the dimensions you entered. Next, click Add Printer Marks, then click the box next to Trim Marks, choose Default style and .25 for Line Weight, click OK. You will see an error box come up saying that the crop marks may overlap the artwork, this is ok, proceed. Now you should see the crop marks outside of the guideline for the TrimBox. Save your file.
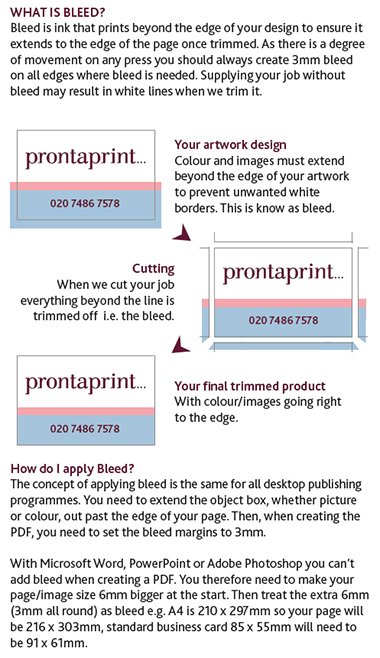
How to create a file with bleeds
Bleeds are used to show any objects in the document that are intended to go all the way to the edge of the printed page. A standard bleed (3mm) gives you some breathing room to make sure the printed piece is correctly cut down to size. Here is how to work with bleeds in different Adobe programs.
InDesign requires you to click the “More Options” button in the new file dialog box to display your bleed settings. Simply enter “3mm”. Once the document opens, the bleed will be a red box that surrounds the page area. The object you want to bleed needs to extend all the way to the red box as opposed to the edge of the page.
Illustrator uses the same setup steps as the ones listed above for InDesign.
Photoshop does not have bleed settings in the program when you are creating a new document. It is possible to create a bleed by adding the bleed size to the document size. To do this, add 6mm to the width and height to make sure you have an extra 3mm on each side.
How to Create Print Ready Project Files
Whether you are using Photoshop, Illustrator, InDesign or some other program to create your design to be used on something that will be printed you’ll need to make sure that file is saved in a way that is considered Print Ready.
What is a Print Ready File?
A print ready file is a design file that has been prepared in a way that makes it ready to be accepted into a printer’s software with minimal or no need for alteration of the file.
This is important for a few reasons:
- It reduces cost due to there being no design fees from the printer
- It reduces the time to start production which can get your project done quicker
- And eliminates potential inconsistencies between what you provided to the printer and what is delivered as the final printed product. You will know what you are going to get!
Creating Print-Ready Files using the Adobe Creative Suite
The most common tools used in Graphic Design and for creating print-ready project files is the Adobe Creative Suite of products or what is now known as the Adobe Creative Cloud. We will explain what needs to be done to create a print-ready file for Photoshop, Illustrator, and InDesign by saving the final art file as a Print Ready PDF.
The first thing we want to mention is that all files regardless of the platform they are created on MUST have a “crop” and “bleed” built into the document. These areas are used to ensure there is enough room for the printer to cut off excess paper and not cut/crop the actual design you have prepared.
To ensure you have enough space for printing include 3mm bleeds and set your margins or guides at a minimum of 3mm on all sides to keep important content.
When saving your print-ready PDF file with bleeds, make sure you have the “trim marks” and “use document bleed settings” features turned on in Illustrator & InDesign or for Photoshop you can use Print with Preview’s crop marks and bleed options, or you can create the crop marks manually.
How to Create a Print Ready File in InDesign
1. Save the file as an Adobe PDF.
2. Start with the High-Quality Print Adobe PDF pre-set.
• Optimize for Fast Web View
• At least
3. Click Export
How to Create a Print Ready File in Illustrator
1. First, convert all text to outlines.
2. Then Save the File as an Adobe PDF.
3. Start with the High-Quality Print Adobe PDF Preset.
• Make sure it is CMYK and 300 dpi.
• Preserve Illustrator Editing Capabilities
• Embed Page Thumbnails
• Create Acrobat Layers from Top-Level Layers
4. Click Save PDF
How to Create a Print Ready File in Photoshop
1. Ensure your file is in CMYK mode.
2. Flatten your design so there are No Layers.
3. Save the file as a Photoshop PDF.
4. Use the High-Quality Print Adobe PDF Preset.
• Preserve Editing Capabilities
• Optimize for Fast Web Preview
5. Click Save PDF
Other tips
All digital files and linked images/photos should be be saved as CMYK colour rather than RGB (unless printing Pantone spot colours for litho printing).
Create your file(s) at the final output size when possible.
Need help, don’t worry, call our team on 020 7486 7578